How to Set Up and Leverage Apple Screen Time – Parental Controls
Research from the Kaiser Family Foundation shows that kids aged 8 to 18 spend an average of 7.5 hours per day (114 full days per year) in front of a screen for entertainment purposes.
Too much screen exposure can contribute to a variety of problems for your kids, from weight gain and irregular sleep patterns to impaired academic performance and behavioral issues.
Are you a parent worried about your kids’ screen time? If so, the Apple Screen Time feature is a great tool that you can start using today to take your parenting to the next level.
This parental control guide for Apple devices will teach parents everything they need to know. This includes how to set up Apple Screen Time, how to turn on the Family Sharing function, and the best ways to leverage this tool, both now and in the future as your kids get older.
What Is Apple Screen Time?
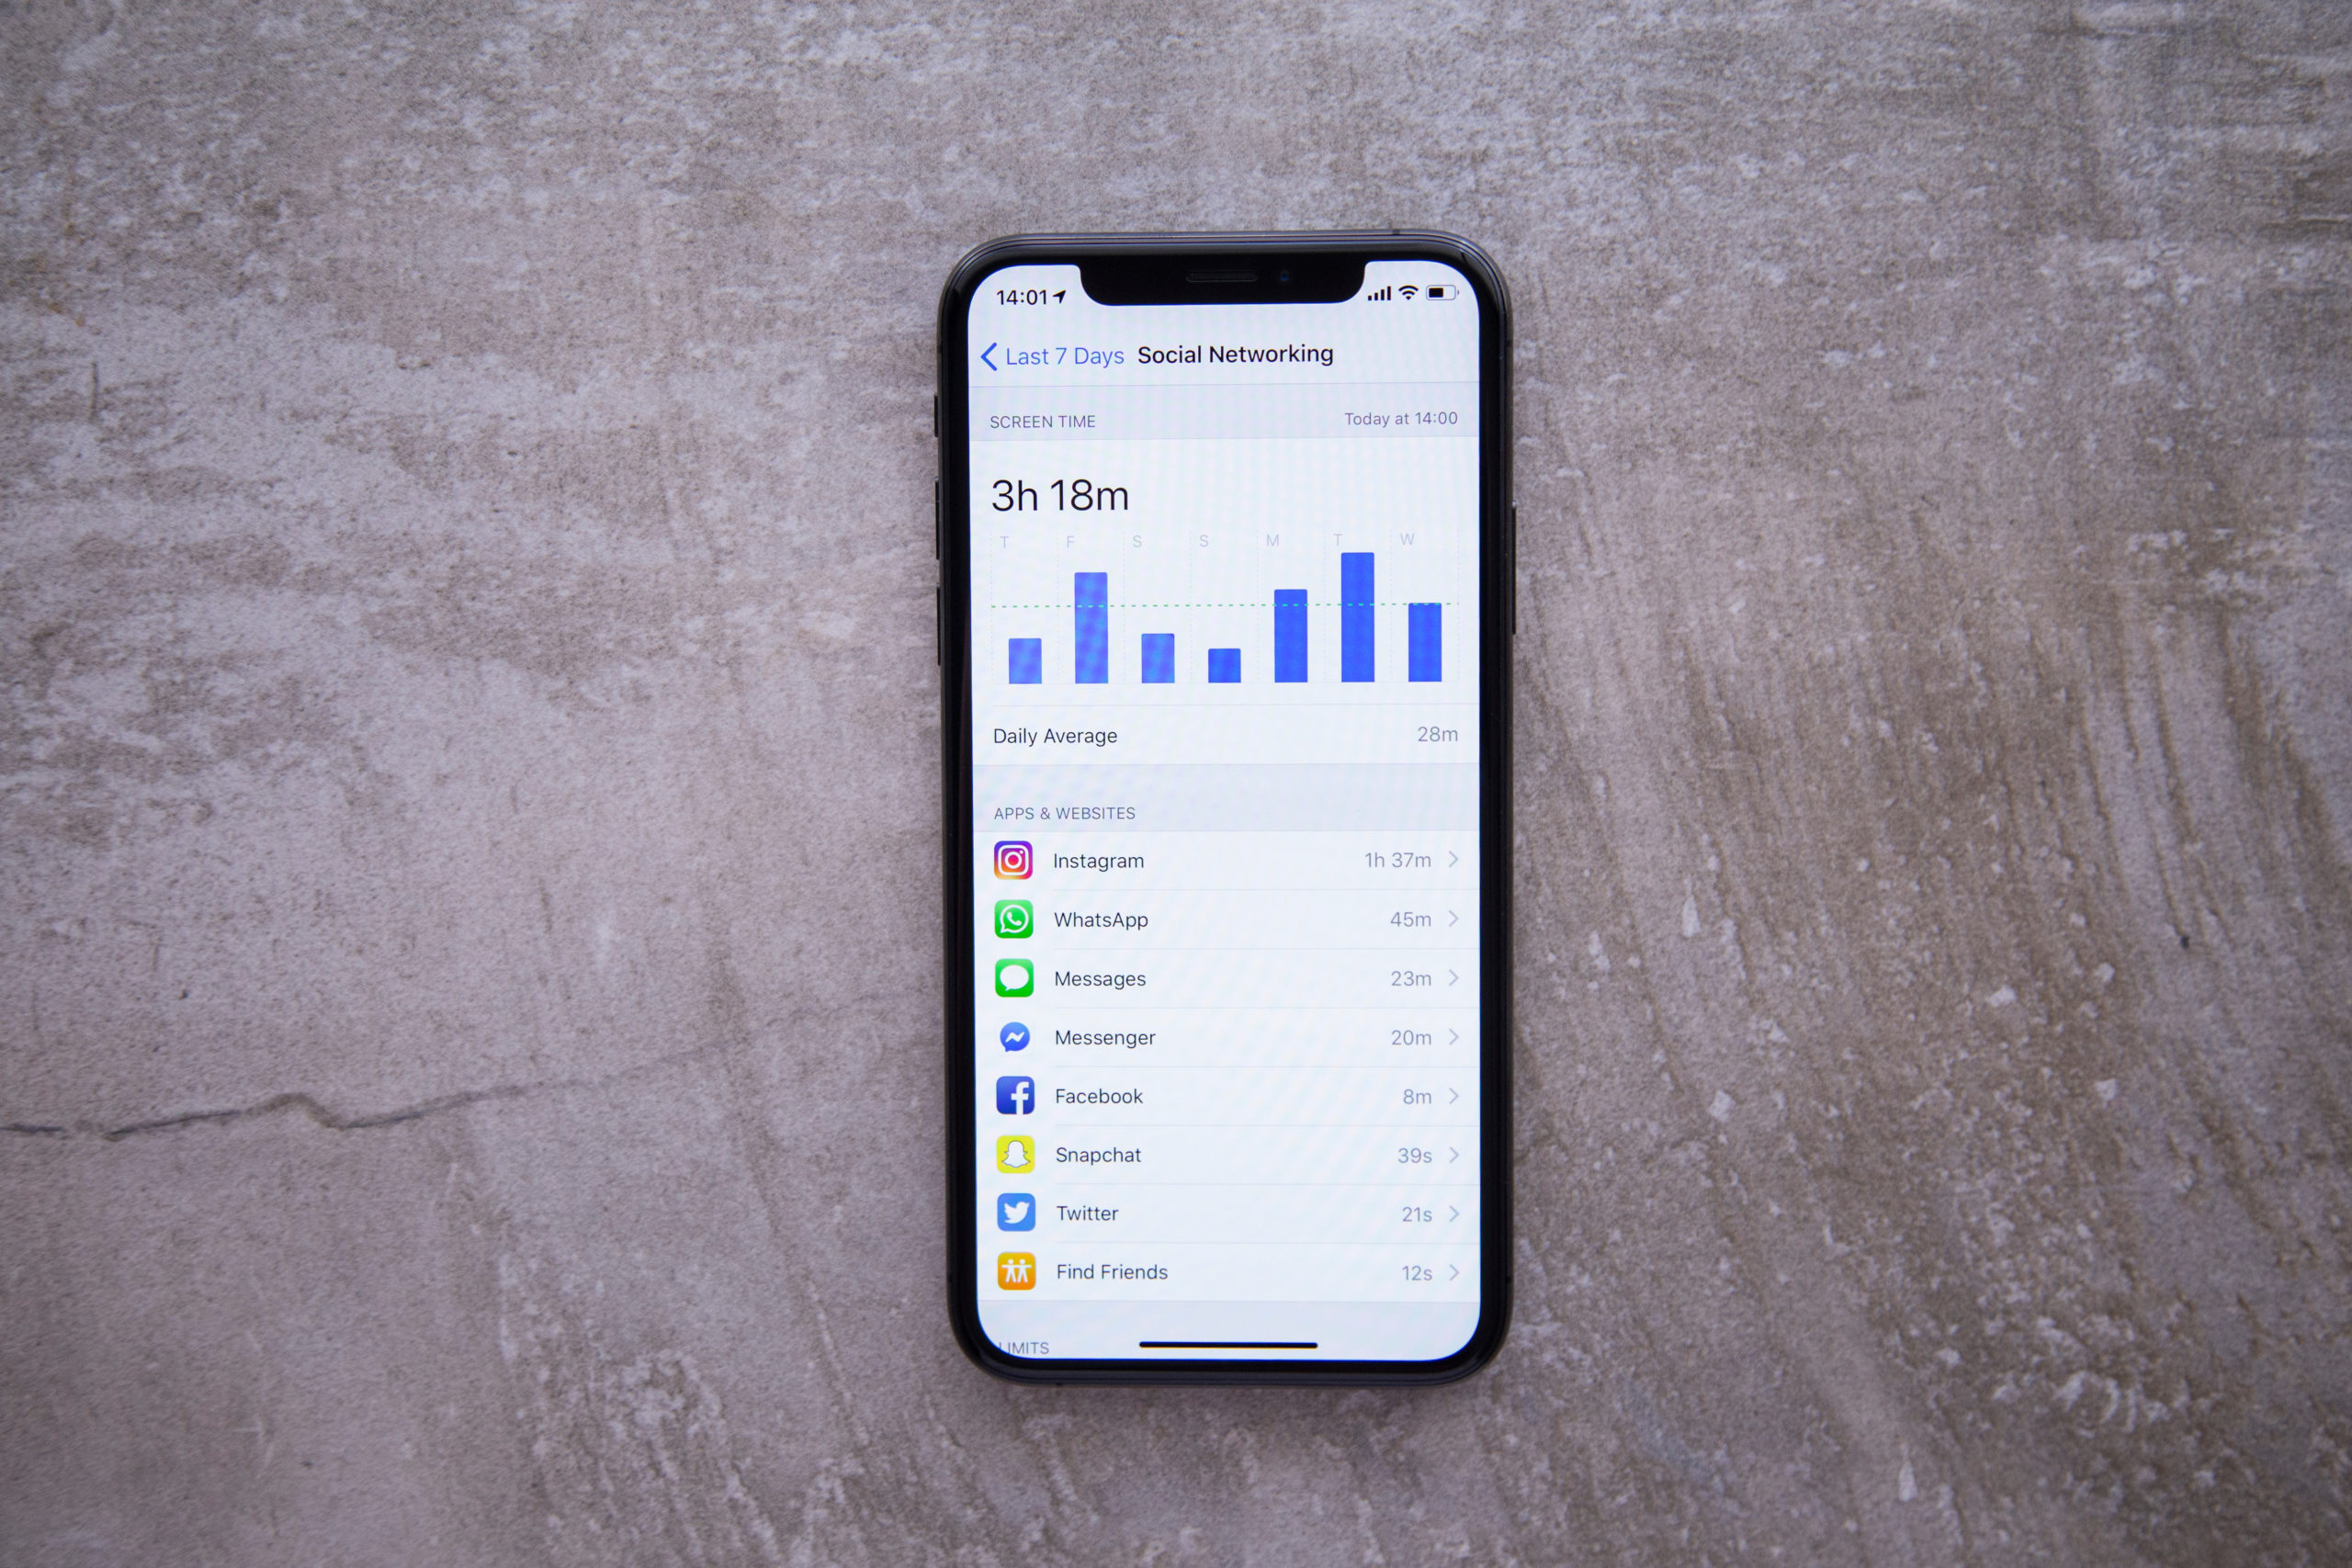
The Screen Time feature is available on a variety of Apple products, including iPhones and iPads.
This feature is designed to let Apple product users, as well as parents whose kids are using Apple products, know how much time is being spent on these devices, as well as on specific apps and websites.
The Screen Time feature allows users and parents to make more informed decisions regarding their devices. It also makes it easy to set limits and establish clear boundaries around technology and screen exposure.
Apple Screen Time Features at a Glance
The Apple Screen Time function provides a variety of helpful tools to Apple product users, particularly parents who have concerns about the way their kids are using their devices. The following are some of the most noteworthy ones to keep in mind:
- Downtime
- App Limits
- Communication Limits
- Always Allowed
- Content and Privacy Restrictions
Downtime
The Downtime feature allows Apple product users to set times when only phone calls — and apps specifically chosen by the user — are available. This feature applies to all Screen Time-enabled Apple devices, and users receive a 5-minute reminder before it kicks in.
The Downtime feature includes an Ask For More Time option, too. This allows users to input a passcode to get extra time with a particular app. For child accounts, kids can click the One More Minute button once or click an Ask For More Time button to request their parent’s approval for additional screen time.
App Limits
The Screen Time feature allows users to set daily time limits for various app categories. For example, parents might choose to turn off their kids’ access to games or social media apps at night or during school hours. App Limits always refresh each day at 12 am and can be deleted at any time.
Communication Limits
Parents can easily control and limit the people with whom their children communicate during the day and when the Downtime feature is enabled.
Screen Time allows parents to put limits on their children’s Phone, FaceTime, Message, and iCloud contacts. Communication with known emergency numbers will always be allowed.
Always Allowed
The Always Allowed feature, as the name suggests, ensures that certain apps are always allowed, even when Downtime is enabled.
The default setting for Apple devices is to set Phone, Messages, FaceTime, and Maps to Always Allowed. Parents can remove them and replace them with others if they choose, though.
Content and Privacy Restrictions
Apple devices with the Screen Time feature allow you to decide what kind of content appears on your device and on your children’s devices.
Through the Content & Privacy Restrictions feature, you can block inappropriate content, prevent purchases, and prevent unapproved downloads. You can also adjust privacy settings with this feature.
How to Set Up and Leverage Apple Screen Time Parental Controls
Now, let’s get into the specifics of how to set up and properly utilize the Apple Screen Time feature. Here are some essential tips that will help you get the most out of this new offering from Apple:
How to Guard Your Child’s iPhone/iPad with Multiple Layers
Most internet security experts recommend multiple layers of protection for all internet-ready devices, especially those being used by children. The 4 layers of protection that provide the greatest level of security are as follows:
- Layer 1: Guard the device’s location
- Layer 2: Control the router
- Layer 3: Implement clean DNS (short for Domain Name System)
- Layer 4: Use Apple Screen Time
Guard Device Location
Place strict limits on where kids are allowed to use their iPhones, iPads, and other devices.
For example, it’s recommended that kids keep these devices out of their bedrooms at night, as screen exposure has been shown to interrupt sleep quality. Kids also tend to take more risks in the privacy of their own bedrooms, so they’re more likely to find their way to inappropriate content in this location.
Control the Router
Placing parental controls on your router is another excellent option for managing your kids’ screen time access and keeping them away from inappropriate content.
If you haven’t already, consider investing in accessories that allow you to block certain websites at certain times (for example, you might want to limit kids from accessing YouTube at night or during homework hours). You can also pause the internet overnight so kids can’t surf or stream when the lights go out.
Implement Clean DNS
DNS is short for Domain Name System. Whenever you (or your children) use a device that connects to the internet, it’s also connecting to servers from all over the world to find information.
When you use clean DNS, this allows you to tell your devices to only look for information on clean, safe servers. As a result, your kids will be less likely to expose themselves to inappropriate content.
Use Apple Screen Time
Apple Screen Time is 4th layer that helps you guard your kid’s screen access and ensure they’re using their devices in healthy, productive, and safe ways. The following sections talk more in-depth about setting up Apple Screen time on your children’s devices.
Using Family Sharing
Before you can set up Screen Time on your children’s devices, you first need to set up the Family Sharing option. To do this, take the following steps:
- Click on the Settings app
- Select your Apple ID at the top of the screen
- Click Family Sharing
- Click Add Member
- Click Create an Account for a Child, the Continue
- Select your child’s birthday
- Complete the screens for terms and conditions, credit card verification, name, and Apple ID
- Toggle the Ask to Buy button so that all purchases must be approved by you
- Click the Done button
If you have more children whose devices need to be added, click the Add Another Child option and repeat the process.
Setting Up Screen Time on Your Kids’ Apple Devices
After you’ve established family sharing, you can continue the multi-layered protection process by setting up Screen Time on each of your children’s devices. To do this, take the following steps:
- Go to the Settings app
- Click the Screen Time button
- Select your child’s name
- Turn on Screen Time
Once you’ve taken these steps, be sure to set a Screen Time Passcode when prompted.
A passcode is a must, as it’s used to prevent your children from disabling Screen Time or sneaking in and changing your parental control settings. With this in mind, don’t pick a passcode that your kids will easily be able to guess, or else they will take advantage of it.
Which Activities Can You Restrict with Parental Control?
Apple products come with robust Parental Control features that allow you to prevent your kids from getting into things they shouldn’t. The following are some specific activities you can restrict on your children’s devices:
Purchases
Apple’s Parental Control feature makes it easy for you to prevent your child from installing or deleting apps, as well as making in-app purchases. To prevent unpleasant surprises on your credit card statement, follow these steps:
- Go to the Settings app and tap the Screen Time button
- Tap on Content & Privacy Restrictions, then enter your passcode if asked to do so
- Tap iTunes & App Store Purchases
- Choose a setting and select the Don’t Allow option
Built-In Apps and Features
If you want to restrict your child’s access to certain built-in apps and features, such as the Mail app, you can do so by turning it off and temporarily hiding it from the home screen. To do this, take the following steps:
- Go to the Settings app and tap the Screen Time button
- Tap on Content & Privacy Restrictions, then enter your Screen Time passcode
- Tap the Allowed Apps button
- Select the specific apps that you want to allow
Explicit Content and Content Ratings
If you want to block your child’s access to explicit content or content with a specific rating (music, TV shows, movies, podcasts, etc.), you can do so with just a few clicks:
- Go to the Settings app and tap the Screen Time button
- Tap on Content & Privacy Restrictions, then tap on Content Restrictions
- Choose the specific settings you want for each feature or the settings listed under Allowed Store Content
Web Content
Both iOS and iPadOS can be set to automatically filter website content and limit children’s access to adult content when they use Safari, as well as other apps. Parents can also add other websites to approved and blocked lists by taking the following steps:
- Go to the Settings app and tap the Screen Time button
- Tap on Content & Privacy Restrictions, then enter the Screen Time passcode
- Tap on Content Restrictions, then tap on Web Content
- Choose one of these options: Unrestricted Access, Limit Adult Websites, or Allowed Websites Only
- After this step, you may need to add more information, such as the URL for the website you want to restrict
Siri Web Searches
You can also limit your children’s internet access and exposure to potentially harmful content by limiting their Siri web searches. You can specifically restrict the following Siri features:
- Web Search Content: This prevents Siri from searching the internet when your child asks a question
- Explicit Language: This prevents Siri from displaying explicit language that may show up in your child’s search results
To implement either of these limits, follow these steps:
- Go to the Settings app, then tap on the Screen Time button
- Tap on Content & Privacy Restrictions, then tap on Content Restrictions
- Scroll down to the Siri option, then choose your preferred settings from the list
Game Center Features
If you have concerns about your child’s gaming, you can restrict a variety of Game Center features with the help of Apple Screen Time. The following are some of the limits you can implement:
- Multiplayer Games: Prevent kids from playing multiplayer games, or allow them to play only with friends
- Adding Friends: Prevent kids from adding friends to Game Center
- Connect with Friends: Prevent kids from sharing their Game Center friend list with third-party games
- Screen Recording: Prevent kids from capturing the screen or sound
- Nearby Multiplayer: Prevent kids enabling the nearby setting in multiplayer games
- Private Messaging: Prevent kids from voice chatting, sending, or receiving custom messages that contain game and friend invitations
- Profile Privacy Changes: Preventkids from changing their profile privacy settings
- Avatar & Nickname Changes: Prevent kids from changing their Game Center avatars or nicknames
If you want to implement any of these restrictions, simply follow these steps:
- Go to the Settings app, then tap on the Screen Time button
- Tap on Content & Privacy Restrictions, then tap on Content Restrictions
- Scroll down to the Game Center option, then choose your preferred settings from the list
Privacy Setting Changes
Apple Screen time allows you to restrict a variety of privacy setting changes on your children’s devices, including the following:
- Location Services: This lets you lock the settings that allow apps and websites to use the device’s location
- Contacts: This prevents apps from accessing your child’s Contacts
- Calendars: This prevents apps from accessing your child’s Calendar
- Reminders: This prevents apps from accessing your child’s Reminders
- Photos: This prevents apps from requesting access to your child’s photos
- Share My Location: This lets you lock the settings for location sharing in the Messages app and the Find My Friends app
- Bluetooth sharing: This prevents devices and apps from sharing your child’s data via Bluetooth
- Microphone: This prevents apps from requesting access to your child’s microphone
- Speech Recognition: This prevents apps from accessing the Speech Recognition or Dictation options
- Advertising: This prevents your child from making changes to advertising settings
- Media and Apple Music: This prevents apps from accessing your child’s photo library, video library, or music library
To allow or restrict changes in your child’s privacy settings, take these steps:
- Go to the Settings app and tap on the Screen Time button
- Tap on Content & Privacy Restrictions, then enter your passcode if asked
- Tap the Privacy button, then choose the specific settings you want to restrict
Other Setting and Feature Changes
Parents can also allow or restrict changes to a variety of other settings and features on their children’s Apple devices, including these:
- Passcode Changes: This prevents changes to your child’s passcode
- Account Changes: This prevents account changes in the Accounts & Passwords tab
- Cellular Data Changes: This prevents changes to your child’s device’s cellular data settings
- Reduce Loud Sounds: This prevents changes to volume settings to ensure safe listening
- Driving Focus: This prevents changes to the device’s Driving Focus settings
- TV Provider: This prevents changes to the device’s TV provider settings
- Background App Activities: This prevents your child from changing whether or not certain apps are allowed to run in the background
To implement these restrictions, take the following steps:
- Go to the Settings app and tap on the Screen Time button
- Tap on Content & Privacy Restrictions, then enter your passcode
- Under the Allow Changes tab, select the specific features or settings you want to allow changes to
- Choose the Allow or Don’t Allow option for each one
Final Thoughts on Apple Screen Time Parental Control
As you can see, there are lots of ways you can utilize Apple Screen Time for kids to control their screen access and ensure they’re using their devices for good.
If you’ve been nervous about the amount of time your kids spend in front of the screen, keep the information discussed in this guide in mind. It’ll help you maximize the Apple Screen Time feature and minimize the harmful effects of excessive screen exposure on your kids.
Remember to be patient as you work to find the right combination of controls, allowances, and restrictions.
Keep in mind, too, that certain limits might not be needed right now. However, they might become important later as your kids get older and start messaging more people or spending more time on their devices.
It takes a while to get things exactly right, and it’s okay if you need to make some adjustments at first. The most important thing is that you care about your kids’ screen time and want to protect them while they’re using phones, iPads, and other devices.